
Roof Leaks
Roof leaks can cause significant damage to your home if not addressed promptly. Common causes of roof leaks include broken or missing shingles, cracked or improperly installed flashing, clogged gutters, ice dams, and general wear and tear over time. Identifying roof leaks early is essential, with signs such as water stains, dripping water, mold growth, and peeling paint indicating potential issues. Regular inspections, both exterior and interior, can help catch these problems before they get worse. In the event of a leak, immediate steps should be taken to control the water, protect belongings, and apply temporary fixes until professional repairs can be made.
Certain areas, like roof valleys, chimneys, skylights, vents, and gutters, are particularly prone to leaks and require regular monitoring. The effects of roof leaks extend beyond structural damage, leading to mold growth and reduced energy efficiency. Preventative measures include regular maintenance, seasonal inspections, and upgrading roofing materials. DIY detection and temporary fixes are helpful, but long-term solutions like professional inspections, installing roof underlayment, and enhancing ventilation are essential. Understanding your insurance coverage and properly documenting damage can expedite the claims process.
Frequent Reasons for Roof Leakage
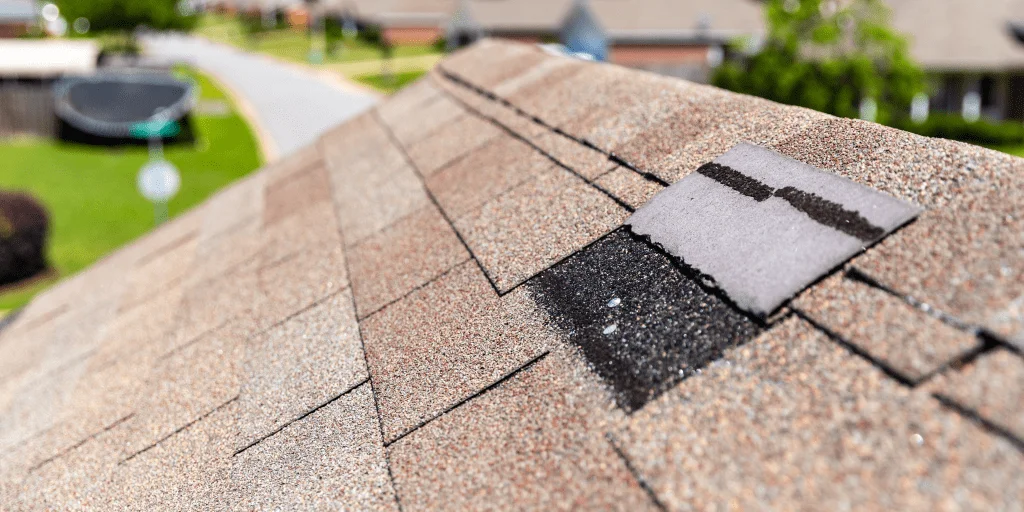
Damaged or Missing Shingles
Deteriorated or missing shingles are one of the most common causes of roof leaks. Shingles can become cracked, curled, or blown away due to severe weather conditions such as strong winds, hail, or heavy rain. When shingles are compromised, they leave the underlying roof structure exposed to the elements, allowing water to seep through and cause leaks. Regular inspections and prompt replacement of broken or missing shingles are crucial for preventing leaks and maintaining the integrity of the roof.
Cracked or Improperly Installed Flashing
Flashing is a critical component of your roof that seals joints and edges, particularly around chimneys, vents, skylights, and other roof penetrations. If flashing is damaged, corroded, or improperly installed, it can create gaps that allow water to penetrate the roof. Over time, even small leaks around flashing can lead to serious water damage. Ensuring that flashing is correctly installed and regularly inspected for damage is essential to prevent roof leaks.
Blocked Gutters and Downspouts
Gutters and downspouts are designed to guide water away from your roof and home. When they become clogged with leaves, debris, or other blockages, water can overflow and pool on the roof. This standing water can seep under shingles and into the roof structure, causing leaks and water damage. Regular cleaning and maintenance of gutters and downspouts are necessary to ensure proper water flow and prevent roof leaks.
Snow Buildup and Ice Dams
Ice dams happen if snow on the roof melts and refreezes near the eaves, forming a barrier that prevents adequate drainage. Water trapped behind the ice dam can seep under shingles and into the roof, causing leaks. Additionally, the weight of snow buildup can cause structural damage to the roof. Proper insulation and ventilation, along with timely removal of snow, can help prevent ice dams and the associated risks of roof leakage.
Aging and Wear and Tear
As roofs age, they naturally suffer wear and tear that can reduce their ability to protect your home. Over time, roofing materials can degrade, become brittle, and lose their effectiveness.
Detecting Roof Leaks
Signs of a Roof Leak
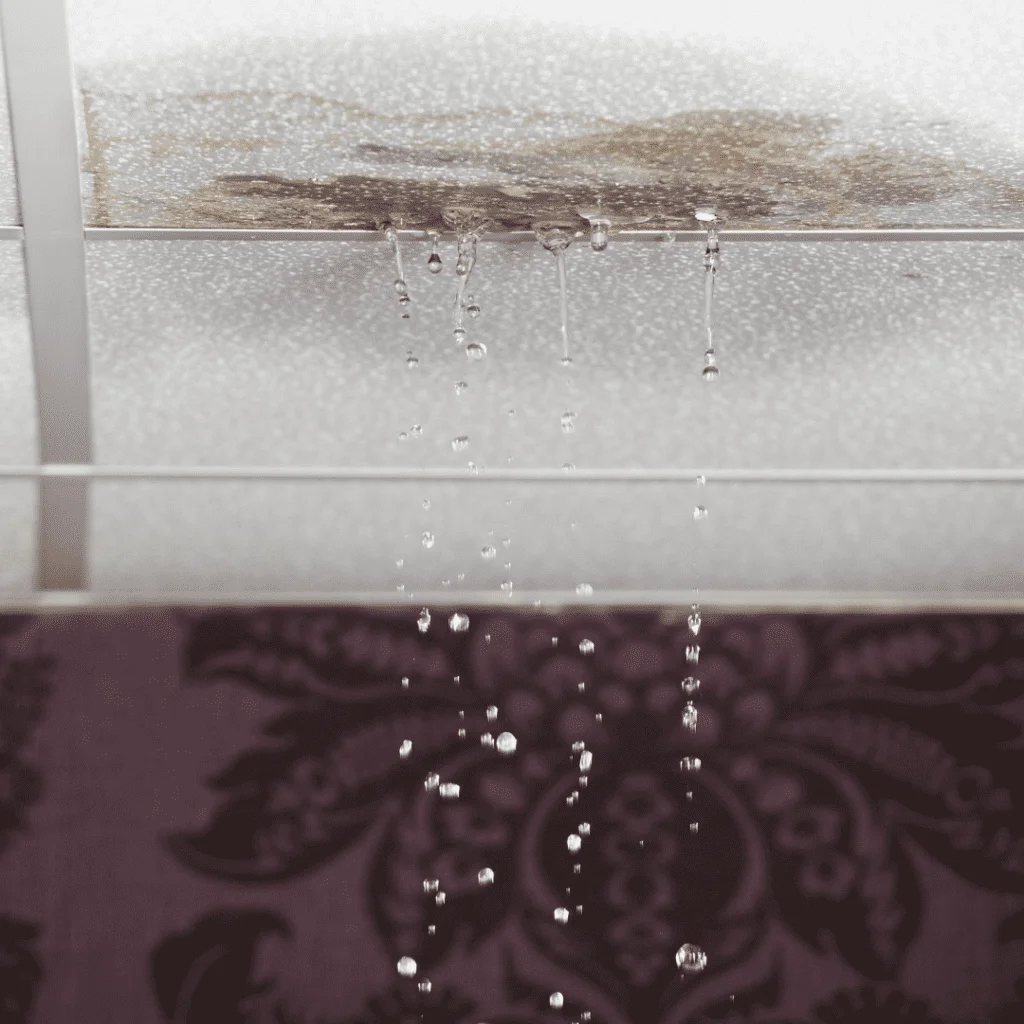
Detecting the signs of a roof leak early can help prevent extensive damage to your home. Common indicators include:
- Water Stains: Stained patches on ceilings or walls often show water intrusion from a roof leak.
- Dripping Water: Visible water dripping from the ceiling, especially after rainfall, is a clear sign of a leak.
- Mildew and Mold: Constant moisture from a roof leak can lead to mold or mildew growth on ceilings, walls, or in the attic.
- Wallpaper Peeling and Paint: Moisture can cause paint to bubble and peel or wallpaper to detach from the walls.
- Musty Odors: A damp, musty smell in your home or attic can be a sign of persistent moisture issues from a roof leak.
Inspecting Your Roof for Leaks
Regular roof inspections can help find leaks before they cause serious damage. Here’s how to inspect your roof for leaks:
Exterior Inspection:
Exterior Scan: Walk around your property and use binoculars to examine the roof for obvious signs of damage, such as missing or damaged shingles, cracked flashing, or debris accumulation.
Inspect Gutters: Ensure gutters and downspouts are clear of debris and functioning properly to prevent water buildup.
Inside Inspection:
Check the Attic: Check your attic during daylight hours. Look for any signs of water stains, mold, or wet insulation. Check for visible light coming through the roof, which suggests holes or gaps.
Ceilings and Walls: Inspect ceilings and walls for water stains, peeling paint, or wallpaper, and any other signs of moisture intrusion.
Specialist Inspection:
Call a Professional: For a thorough and safe inspection, think about hiring a professional roofing contractor. They have the expertise to identify subtle signs of damage and potential leaks that may not be visible to the untrained eye.
Water Tests for Detecting Leaks
If you suspect a leak but cannot locate its source, a water test can help identify the problem area:
Prepare for the Test:
Pick a Dry Day: Carry out the water test on a dry day to ensure accurate results.
Have a Helper: You’ll need someone inside the house to watch for signs of a leak while you conduct the test outside.
Conduct the Test:
Employ a Hose: Start by spraying water on the roof, beginning at the lowest point and steadily working your way up. Focus on one small section at a time.
Watch Inside: Have your helper stay inside the house, watching for any signs of water intrusion. Coordinate via phone or walkie-talkie to determine the exact location of the leak.
Identify the Leak:
Mark the Area: Once the leak is detected, mark the area on the roof where water is entering. This will help guide your repairs or provide useful information for a professional roofer.
Repair the Leak:
Temporary Fix: Apply a temporary fix, such as roofing cement or a tarp, to prevent further water intrusion until a permanent repair can be made.
Professional Repair: For a long-lasting solution, contact a professional roofing contractor to address the leak and repair any underlying damage.
What to Do Immediately When You Find a Leak
Containing the Water Damage
The first priority upon discovering a roof leak is to control the water damage to prevent it from spreading and leading to further damage to your home. Here are some immediate steps to take:
Collect the Water: Place buckets, pans, or other containers under the leak to catch dripping water and prevent it from pooling on your floors.
Alleviate Water Pressure: If water is bulging under paint or wallpaper, use a small pin to puncture the bubble and release the pressure. This helps prevent further damage to your walls and ceilings.
Dry the Space: Use towels, mops, and fans to dry the affected area as much as possible. Reducing moisture helps prevent mold and mildew growth.
Protecting Your Belongings
Protecting your belongings from water damage is vital. Follow these steps to safeguard your possessions:
- Shift Items: Transfer furniture, electronics, and other valuables away from the leak. If moving them isn’t possible, cover them with plastic sheeting or tarps to shield them from water.
- Lift Items: Place items on elevated surfaces or use blocks to lift furniture off the floor, avoiding water damage from spreading.
Shield Important Documents: Store important documents, photos, and other irreplaceable items in waterproof containers or move them to a safe, dry location.
Temporary Solutions to Prevent Further Damage
Applying temporary solutions can help in preventing further damage until expert repairs can be made. Here are some effective temporary measures:
Use Roofing Cement: For small leaks, use roofing cement to cover the damaged area temporarily. This helps prevent water infiltration and provides a short-term fix.
Employ a Tarp: Place the damaged section of the roof with a waterproof tarp. Secure the tarp with roofing nails or heavy weights to guarantee it stays in place, especially during windy conditions.
Apply Sealant to Cracks and Joints: Apply sealant or caulk to any visible cracks or gaps around flashing, vents, and other roof penetrations. This can help reduce water entry points until a permanent repair is made.
Install Spare Shingles: If safe to do so, replace any missing or damaged shingles with spare ones you may have. This can provide temporary protection from water intrusion.
Taking these immediate steps can help minimize water damage and protect your home and belongings until you can arrange for a professional roofing contractor to make the necessary repairs.
Common Areas Prone to Leaks
Roof Valleys
Roof valleys are where two roof planes meet, forming a V-shaped dip that channels water runoff. These areas are particularly prone to leaks due to the volume of water that flows through them. If the valley is poorly sealed or becomes damaged, water can seep through the roofing material and into your home. Regular inspection and maintenance of roof valleys, including checking for proper flashing and sealing, are essential to prevent leaks.
Chimneys and Skylights
Roof penetrations like chimneys and skylights are common sources of roof leaks because they break through the roof and create opportunities for water infiltration. The flashing around chimneys and skylights can become detached, cracked, or corroded over time, allowing water to enter. Additionally, improper installation or damage to the seals can cause leaks. It's vital to examine the flashing and seals around chimneys and skylights regularly and to repair or replace them as needed.
Roof Vents and Pipes
Roof vents and pipes offer necessary ventilation and exhaust for your home, but they also create potential leak points. The seals or boots around these penetrations can deteriorate due to weather exposure, UV radiation, and age, leading to leaks. Regularly examining the seals around roof vents and pipes and replacing them when they show signs of wear can help prevent leaks.
Rain Gutters and Downspouts
Gutters and downspouts are crucial in directing water away from your roof and home. When gutters and downspouts become obstructed with leaves, debris, or ice, water can overflow and pool on the roof, leading to leaks. Additionally, incorrectly sloped gutters can cause water to back up and seep under the roofing material. Regular cleaning and maintenance of gutters and downspouts are essential to guarantee they function correctly and prevent roof leaks.
Consequences of Roof Leaks on Your Home
Potential for Structural Damage
Roof leaks present significant risks to the structural integrity of your home. Continuous water infiltration can weaken the roof deck, rafters, and trusses, leading to wood rot and deterioration. Over time, this can undermine the stability of the roof and the overall structure of the house. Additionally, leaks can cause damage to ceilings, walls, and floors, leading to costly repairs. Promptly addressing roof leaks is crucial to prevent extensive structural damage and maintain the safety and stability of your home.
Growth of Mold and Mildew
Persistent roof leaks create a damp environment conducive to mold and mildew growth. Mold spores thrive in moist conditions and can quickly spread throughout your home, harming indoor air quality and posing health risks to occupants. Mold exposure can lead to respiratory issues, allergies, and other health problems. Mildew, a type of mold, often shows up as dark, blotchy patches on walls, ceilings, and other surfaces. Preventing leaks and addressing them promptly can help manage mold and mildew growth and protect your family's health.
Influence on Insulation and Energy Efficiency
Water from roof leaks can drench and damage insulation in your attic and walls. Wet insulation loses its effectiveness, diminishing your home's energy efficiency. This can cause increased heating and cooling costs as your HVAC system works harder to maintain a comfortable indoor temperature. Additionally, compromised insulation can result in uneven temperatures and drafts, impacting the overall comfort of your home. Repairing roof leaks and replacing damaged insulation can restore energy efficiency and reduce utility bills.
Stopping Roof Leaks
Tips for Regular Roof Maintenance
Consistent roof maintenance is crucial for preventing leaks and prolonging the lifespan of your roof. Here are some key maintenance tips:
- Maintain Gutters and Downspouts: Ensure that gutters and downspouts are free of debris to prevent water from backing up and seeping under the roofing materials.
- Examine Flashing: Routinely check the flashing around chimneys, vents, skylights, and roof valleys. Look for signs of corrosion, cracks, or looseness, and repair or replace as needed.
- Trim Overhanging Branches: Maintain tree branches trimmed away from the roof to prevent damage from falling limbs and to lessen debris accumulation.
- Remove Debris: Remove leaves, twigs, and other debris from the roof surface to stop water buildup and potential leaks.
- Check for Damaged Shingles: Consistently examine shingles for signs of damage such as cracks, curling, or missing pieces. Change any damaged shingles without delay.
Routine Seasonal Inspection Checklist
Performing seasonal inspections can help detect potential problems early on and prevent leaks. Here’s a seasonal checklist to keep your roof in top condition:
During Spring:
Clean out gutters and downspouts of winter debris.
Examine the roof for damage caused by ice and snow.
Identify mold, mildew, or algae growth.
Identify signs of wear and tear on shingles and flashing.
During Summer:
Inspect the roof for heat damage, such as blistering or warping shingles.
Confirm proper attic ventilation to prevent overheating.
Trim tree branches and clear any debris from the roof surface.
During Fall:
Remove debris from gutters and downspouts to prepare for heavy rains and snow.
Check the roof for damage from summer storms.
Check flashing and seals around roof penetrations.
Identify any signs of wear and damage to shingles.
Winter:
Remove heavy snow buildup to avoid ice dams.Check for leaks after severe weather events.
Inspect for leaks after severe weather events.
Ensure attic insulation is adequate to avoid ice dam formation.
Watch for any signs of leaks or water damage indoors.
Enhancing Roofing Materials for Improved Protection
Upgrading your roofing materials can ensure better protection against leaks and prolong the lifespan of your roof. Consider the following options:
- Metal Roofing: Metal roofs are highly durable, weather-resistant, and have a long lifespan. They are less likely to form leaks compared to traditional shingles.
- Architectural Shingles: These shingles are thicker and more durable than standard three-tab shingles. They offer better resistance to wind and impact damage.
- Synthetic Roofs: Synthetic options, such as rubber or plastic-based materials, replicate the look of traditional roofing while offering superior durability and resistance to weathering.
- Reflective Coatings: Coating with reflective coatings to your roof can reduce heat absorption, lower cooling costs, and protect the roof from UV damage.
- Enhanced Flashing: Use high-quality flashing materials around roof penetrations to provide a tight seal and prevent water infiltration.
Regularly performing regular maintenance, seasonal inspections, and improved roofing materials can significantly reduce the risk of roof leaks and protect your home from water damage.
DIY Detection and Temporary Fixes
Essential Tools and Materials for Detection
To successfully detect and manage roof leakage, you'll need the following tools and materials:
- Extension Ladder: A strong, secure ladder to securely access the roof.
- Field Glasses: For examining the roof from the ground.
- Torch: To check dark areas in the attic or under the roof.
- Water Hose: Helpful for simulating rain to identify leaks.
- Roofing Cement: For closing small cracks and holes.
- Tarp and Roofing Nails: To cover larger damaged areas temporarily
- Cutting Knife: For trimming shingles and other materials.
- Caulking Gun: For applying roofing cement or sealant.
- Extra Shingles: To replace missing or damaged shingles.
- Tape Measure: To ensure accurate measurements.
- Work Gloves: To protect your hands from sharp edges.
- Fall Protection Harness: For added safety when working on the roof.
Step-by-Step Instructions for Temporary Repairs
When you discover a roof leak, temporary fixes can help prevent further damage until professional repairs can be made. Follow these steps:
Find the Leak:
Use a flashlight to examine your attic for signs of water stains, mold, or damp insulation.
In daytime, look for signs of holes or gaps where sunlight is entering.
If you cannot identify the leak, use a hose to simulate rain and have someone inside the attic to spot where water is coming through.
Use Roofing Cement:
For small leaks, put roofing cement straight to the damaged area. Use a caulking gun to ensure a precise application.
Level the cement with a putty knife to ensure it fills the crack or hole completely.
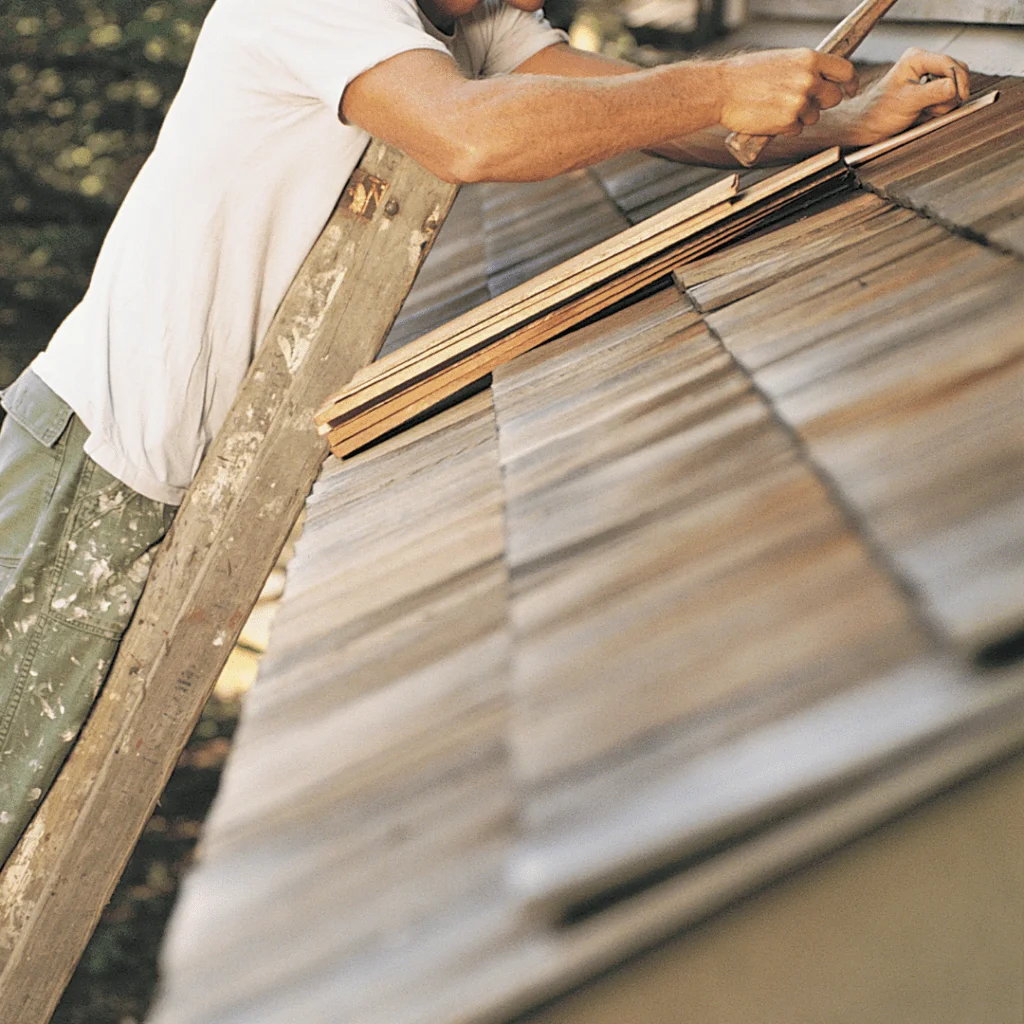
Change Missing or Damaged Shingles:
Slowly remove the damaged shingles using a utility knife and pry bar.
Slide new shingles into place and fasten them with roofing nails.
Apply roofing cement to the edges of the new shingles to ensure a watertight seal.
Place a Tarp:
For larger areas of damage, drape the section with a waterproof tarp.
Fasten the tarp with roofing nails or heavy objects to keep it in place.
Make sure the tarp extends beyond the damaged area to prevent water from seeping under it.
DIY Leak Management Safety Tips
Safety is paramount when dealing with roof leaks and repairs. Adhere to these safety tips to protect yourself:
Be Aware of the Weather: Stay away from working on the roof during adverse weather conditions such as rain, snow, or high winds. Hold off until clear, calm weather to perform inspections and repairs.
Use Proper Safety Gear: Without exception wear non-slip shoes, work gloves, and a safety harness when working on the roof. Ensure your ladder is stable and positioned on solid ground.
Team Up with a Partner If possible, have someone assist you. They can hold the ladder, pass tools, and provide support in case of an emergency.
Be Cautious of Roof Stability: Walk carefully on the roof, especially around damaged areas. Distribute your weight evenly to avoid causing further damage or losing your balance.
Avoid Power Lines: Be aware of overhead power lines and ensure a safe distance.
Recognize Your Limits: If a repair seems too complex or risky, it's best to call a professional. DIY repairs are suitable for minor issues, but extensive damage requires expert attention.
Long-Term Solutions for Leak Prevention
Specialist Roof Inspections
One of the most effective long-term solutions for preventing roof leaks is setting up regular professional roof inspections. Experienced roofing contractors can identify potential issues that may not be visible to the untrained eye. Here’s what to expect from a professional roof inspection:
- Detailed Check: Roofing contractors will check all aspects of your roof, including shingles, flashing, gutters, and downspouts, to verify everything is in good condition.
- Timely Detection: Regular inspections can identify small problems before they become major issues, saving you time and money on extensive repairs.
- In-depth Report: After the inspection, you’ll receive a thorough report outlining any areas of concern and recommended actions to preserve your roof’s integrity.
- Proactive Maintenance: Professionals can provide proactive maintenance services, such as cleaning gutters, repairing flashing, and replacing damaged shingles, to keep your roof in top shape.
Installing Roof Underlayment
Installing roof underlayment is a crucial step in leak prevention. Underlayment acts as an added barrier between your roof deck and the shingles, providing extra protection against water infiltration. Here’s how it helps:
- Moisture Barrier: Underlayment is designed to be impermeable, preventing moisture from penetrating through to the roof deck.
- Weather Protection: It provides an extra layer of defense against extreme weather conditions, such as heavy rain, snow, and ice.
- Enhanced Durability: Underlayment helps safeguard the roof deck from potential damage caused by leaks, increasing the overall lifespan of your roof.
- Varieties of Underlayment:There are several types of underlayment available, including asphalt-saturated felt, non-woven, and bitumen. Each type offers different levels of protection and durability, so it’s essential to choose the right one for your specific needs.
Upgrading Roof Ventilation
Effective roof ventilation is essential for preventing leaks and ensuring the overall health of your roof. Proper ventilation helps regulate temperature and moisture levels in the attic, preventing various issues:
- Reduces Ice Dams: Good ventilation lowers the chance of ice dams forming by maintaining a consistent temperature across the roof.
- Decreases Moisture Accumulation: Proper airflow helps avoid moisture accumulation, which can lead to mold growth, wood rot, and structural damage.
- Prolongs Roof Lifespan: By stopping overheating and moisture build-up, effective ventilation helps extend the life of your roofing materials.
- Ventilation Options: Roof ventilation systems include roof ridge vents, soffit vents, and gable vents. A combination of intake and exhaust vents provides efficient airflow throughout the attic.
Applying These Solutions
Applying these long-term solutions can greatly reduce the risk of roof leaks and ensure your home remains protected. Regular professional inspections, the installation of quality roof underlayment, and enhancing roof ventilation are key steps in maintaining a leak-free roof.
Roof Leak Insurance Considerations
Understanding Your Coverage
Being aware of what your homeowner's insurance covers is essential when dealing with roof leaks. Here are key points to understand:
Types of Coverage: Most standard homeowner's insurance policies cover abrupt and unforeseen damage caused by perils such as storms, hail, and wind. However, they typically do not cover damage resulting from neglect or lack of maintenance.
Policy Limits: Review your policy to understand the limits of your coverage, including any deductibles you may need to pay yourself before the insurance kicks in.
Exclusions: Understand any exclusions in your policy, such as damage caused by floods or earthquakes, which may require separate coverage.
Policy Endorsements and Riders: You can purchase additional coverage through endorsements or riders to cover specific risks not included in your standard policy, such as water backup from clogged gutters.
Processing an Insurance Claim for Leak Damage
When you discover a roof leak, submitting an insurance claim can help cover the cost of repairs. Here’s a step-by-step guide to the process:
Document the Damage: Photograph detailed photos and videos of the leak and any resulting damage. This evidence is crucial for your insurance claim.
Understand Your Policy: Learn what your policy covers and the claim process. Note any deadlines for filing claims.
Contact Your Insurance Company: Notify your insurer as soon as possible. Offer them a detailed description of the damage and how it occurred.
Schedule an Inspection: Your insurance company will likely send an adjuster to inspect the damage. Be present during the inspection to show all affected areas.
Request Repair Estimates: Obtain estimates from licensed roofing contractors for the repair work. Getting multiple estimates can help ensure a fair assessment.
Send Your Claim: Complete the necessary claim forms and submit them along with the documentation and repair estimates to your insurance company.
Stay in Touch: Communicate with your insurance company throughout the process. If you encounter delays or issues, inquire promptly to ensure your claim is processed efficiently.
Review the Settlement: Once your claim is processed, assess the settlement offer. If you believe it is insufficient, you can negotiate or appeal the decision.
Guidelines for Documenting Damage
Thorough documentation is critical for a successful insurance claim. Observe these tips to ensure you have comprehensive records:
- Capture Clear Photos and Videos: Record multiple angles of the damage, both up-close and wide shots. Incorporate photos of the exterior roof, interior ceilings, walls, and any affected belongings.
- Date and Label: Mark with the date all photos and videos and tag them with descriptions of the damage and location within your home.
- Record a Damage Log: Maintain a written log of all damage, including the date it was discovered and any actions taken to mitigate it, such as temporary repairs.
- Keep Receipts and Invoices: Retain all receipts and invoices for any temporary repairs or services related to the leak. These documents can support your claim for reimbursement.t.
- Record Correspondence: Document all communications with your insurance company, including emails, phone calls, and in-person meetings. Note the date, time, and content of each interaction.
- Expert Reports: If you hire a roofing contractor or other professional to assess the damage, retain copies of their reports and estimates.
Comprehending your coverage, accurately filing an insurance claim, and comprehensively documenting damage can streamline the process and improve the chances of a successful claim.
Roofers Lemay, MO – The Lemay, Mo roofing contractor you can trust!